Adjusting to a New Life – Recap of Our First Month Abroad

As I mentioned in my previous post, my family and I have moved to the Middle East. So far we have lived in 2 beautiful five-star hotels, strolled more than our fair share of malls, eaten lots of tasty food, moved into our apartment and begun settling into our new lives and roles here in this somewhat foreign land.

I say “somewhat foreign” because it’s really a lot like the US here. There are plenty of differences but mostly, it’s very similar. It’s highly developed, commercial, easy to get around and live here. There have been quite a few cultural differences but nothing that impedes our ability to live comfortably.

Children can do no wrong here. They are generally loved and appreciated more than anywhere I have ever been. In New York City, children are mostly a nuisance to people. There is obvious eye rolling and sighing just because your children exist on Earth. Definitely not the case here. Things my children can do here that they couldn’t do in New York:

  1. Go play in the hallway of our building with a dozen other children without me standing watch over them.
  2. Go to any mall and have an entire play area dedicated to their entertainment.
  3. Go to a government building and have an entire play area dedicated to their entertainment.
  4. Go into that same government building, act up, and be offered packages of cupcakes.
  5. Go into that same government building and be offered scores of chocolates by the employees.
  6. Be admired, patted, and adored by strangers. Women will seriously come up to my 5-year-old, stroke her face and hair and tell her how beautiful she is. People are mostly just trying to keep my 3-year-old out of trouble, i.e. keeping her from getting off elevators at the wrong floor.

We spent our first 2 weeks or so in the city of Abu Dhabi. Abu Dhabi is the largest emirate (like a state) in the United Arab Emirates. Dubai is another emirate. Just to be clear, we don’t live in Dubai. We are about a 90 minute drive away from Dubai.

This was the view from our gorgeous, 5-star hotel

This was the view from our gorgeous, 5-star hotel

We went to the beach in the evening; it’s quite hot here. 95º Fahrenheit is now pretty cool to me. I have to dress very modestly for work so that means even if it’s 115º, which is common, I’m probably wearing a long-sleeved cardigan. Surprisingly, covering up in the heat isn’t uncomfortable. It protects my skin and I sweat less. I’ve adjusted to the heat, except when I have to park outside. Underground parking should be mandatory!

Night time is the best beach time!

Night time is the best beach time!

After training and orientation and a little sightseeing in Abu Dhabi, we were moved to our permanent location in Abu Dhabi. We now reside in the city of Al Ain. Al Ain is gorgeous. It’s much more “desert-like” than Abu Dhabi city, it’s less humid and there is more sand. There are also many more trees and plants. We were living in a hotel here too…for about a week. Even with all the nice pools and free breakfast, we were over hotel living.

IMG_20150817_162126

Al Ain!

We moved into our apartment almost two weeks ago. It’s much bigger than what we had in NYC. We have 3 bedrooms + a small “nanny’s quarters” that we use as an office, and 3.5 bathrooms. We have a washing machine (which is AWESOME, probably my favorite thing LOL) and all new appliances. But best of all, it’s FREE. We do not pay for housing.

I teach science at an all girls Cycle 2 (grades 6,7,8,9) school and, lucky for me, I was placed in a good school. The girls are lovely albeit chatty and very sweet & innocent. The most difficult thing for me right now is that I have 7th and 8th graders when I have always taught high school. The children are not the problem; the struggle is that I can’t use any of the lessons I’ve already created. I’m starting fresh which all my educators know is no easy task.

Some fun facts before I go:

  • The work week is Sunday-Thursday. Working on Sunday is kind of strange but I love that the week ends on Thursday. It’s psychological.
  • Whenever you order food, even fast food, you will have to wait for it because they are cooking it right now. I’ve never had so much hot, fresh food. Order the cole slaw at Popeye’s and it’s not being scooped out of some vat. You have to wait 10 minutes while they cut up the vegetables and assemble it for you.
  • Fresh dates taste totally different from the dates I’ve eaten in the USA. They are SO GOOD! I fear I can never go back to the dates on the other side.
  • Mall culture here is HUGE. There are so many malls. Like, I don’t even care about a mall anymore. Anything I need, I’m sure I can get it in a mall. I turned my water and electricity on in a mall. I can do my grocery shopping in a mall. I can ice skate in a mall.

That’s all for now! I’ll be back with more updates and I will do a post about the effect of the harsh water on my hair here and what I’m concocting to deal with it. Until next time!

New Address!

I’m annoyed right now…but I have no one to blame but myself. In the midst of an international move, stress, and a zillion things to do, I let my subscription lapse for 2 months. Apparently that’s enough time for WordPress to send my domain name back to the “registrar” (whoever that is) and my domain was sold. I could try to get it back…but I just have just so much on my plate right now I just bit the bullet and now you can easily visit this site at its new address

www.hippiebrowngirl.org

Please update your bookmarks if you have any of my recipes bookmarked. My sincere apologies! I hope you will stick with me for more recipes and discussions of ingredients in the future as well as updates about my family’s travels & adventures.

We are moving in less than a week to the Middle East. We plan to travel a lot and I will certainly keep you posted on our new life.

Thank you for your patience, concern, and just all-around niceness.

Big changes!

It has been quite some time, hasn’t it?

You may have noticed that my domain expired. I will try to renew it soon (cross my fingers!) but you can still visit here at http://www.hippiebrowngirl.wordpress.com

I’ve been swamped recently because my family and I are moving out of the country for a couple of years. Crazy, right? I received an email from a recruiter in March and the whirlwind started there. Within a month, I was hired to teach abroad. We had never really considered such a huge move before but when a great opportunity presents itself, you have to take it! The pay is good and we’ll be able to travel to places we could only dream of visiting from here.

With all the expenses associated with the move, I just haven’t been able to justify the cost of renewing the domain. As you know, I run this blog alone and I don’t have ads on the site because it’s just not that kind of party. This blog isn’t a money making venture for me. It’s fun and I genuinely enjoy sharing information with you all. I will certainly keep the blog up and I will be trying to post regularly so stay tuned! If there is interest, I will definitely post about my family’s traveling adventures.

Please feel free to continue to email me at hippiebrowngirl@gmail.com with questions and suggestions. Thanks for sticking with me!

The Ultimate Starter Guide for DIY Skincare

So you want to start making your own skincare products but you don’t know where to start or what to buy?  I’m here for you!  In this post, I will discuss some essentials for your kit and some items that are nice but optional.  By the end, you should have a basic shopping list started.  The item links take you to my favorite products (free advertising so you know I must really like them).

This post has been a long time coming and it’s been a hot request in my email inbox (which is hippiebrowngirl@gmail.com).  Let’s get started!

Basic Equipment

I refer to basic equipment in my intro to lotion making post but let’s reiterate here.  You NEED:

  • a stick blender Listen.  Don’t get the cheap $10 one.  You will be sorry.  Trust me, I know from experience.  Get a decent one, doesn’t have to be the most expensive option. I’ve been using this one for about 3 years now on a regular basis and it’s still in perfect working order.  My favorite feature is that the stick is detachable so I can clean it easily and quickly without fear of electrocution.
  • weighing and mixing containers  I suggest mason jars because they’re cheap and easy to find but it doesn’t really matter as long as they’re heat-resistant (microwave-safe, can be placed into simmering water) and easy to clean.  I go for glass over plastic because plastic holds smells and also because I don’t like plastic.  Seriously – I don’t even own plastic tupperware, only Pyrex dishes.
  • scale This isn’t a link to a specific scale.  Get whichever one you’d like.  I don’t have a preference although consider the batteries needed because they can be a pain to replace

Those are the pieces of equipment you absolutely need.  The following items are nice to have but optional.

  • glass mixing bowl Pyrex is good.  You want to get a size that could fit comfortably on top of a pot so you can fashion a double boiler.  This is also good for mixing if you like to make body butters that don’t require an emulsion (because they don’t contain water).
  • disposable pipettes  These come in handy when you put just a little too much of an ingredient into a container.  They allow you to remove a gram or two at a time so you don’t exasperate yourself unnecessarily.
  • glass pitcher I don’t have a preference for this either but make sure it has a handle.  This is my favorite container for mixing because your stick blender stays immersed easily making for a smoother emulsion and little to no air bubbles.  It’s easy to pour your lotion once mixed and it’s nice and tall so your stick blender will have no problems fitting.
  • large metal spoon Stainless steel is best.  This is good tool to have when your emulsion is acting weird or you’re getting bubbles.  It’s also essential if you’re going to start making soap.
  • silicone spatula To get allllll the lotion out
  • electric mixer This is nice to have if you make body butters or if you like to whip your creams after emulsifying.  That can be really luscious and velvety, especially for a foot or hand cream.

So that’s the hardware.  How about the ingredients?  Well, here is where it gets fun!  But what’s fun for me might not be fun for you so feel free to substitute as you see fit.

Basic Ingredients

You NEED:

  • distilled water – I didn’t link to this because I get it at the grocery store.  It’s cheap.  No, tap water will not do.  No, boiled tap water will not do.  No, filtered tap water will not do.  DISTILLED WATER.
  • antioxidant I use vitamin E oil
  • emulsifier  I recommend emulsifying wax NF because it’s virtually foolproof.   (You can order it here too, same place as previous link, for the same price.)
  • preservative Maybe it’s controversial to say you NEED this but once you really start making lotion, you’ll need a preservative.
  • butters – I didn’t link to this because the choices are vast.  I personally always have shea and mango butters on hand.  Sometimes I have cocoa butter around, sometimes I have other, more exotic butters.
  • oils – Again, I didn’t link here because there are so many.  I just about always have the following oils: jojoba, avocado, camellia, castor, fractionated coconut, apricot kernel, sweet almond.  But I also have others and I try new oils often.  It’s really fun to try new oils. [Check out my post on picking oils & butters here]

So that’s what you must have.  Now for the hard part.  What’s nice to have but optional?  I could write about 2,292 items on this list but I will restrain myself.  I will give you the basic optional list.  This is a starter guide.  As you start to play, you will find your own way.  Hey, that rhymes.

  • humectant – Sorry, no link here either.  I use raw honey or glycerin depending on what I’m making and I purchase both of those items from the grocery store.
  • essential oils – There are seriously hundreds of options.  The trick with essential oils is to do your (credible) research before you use them.  The essential oils I always have (or try to always have) are: lavender, peppermint, spearmint, clove, geranium, ylang ylang, patchouli, rosemary.  But there are so many, many other lovely options.  Essential oils can be expensive, though, so don’t blow your whole budget on them and use them sparingly.  They’re potent!
  • conditioning emulsifier You can emulsify without this but it’s silky and smooth and I like it sometimes.  I use it with emulsifying wax, not instead of it.
  • thickener – I put this here because I know a lot of people like thickeners.  I almost never use thickeners in skincare but I do occasionally use them in hair products, like conditioners.  Stearic acid and cetyl alcohol are good ones.
  • hydrosols Like essential oils, there are so many choices!  I particularly love chamomile, calendula, cucumber for their wonderful healing properties.  The citrus ones smell great.  A little goes a long way here, don’t overdo it.
  • aloe vera LIQUID Not gel.  Use aloe vera liquid instead of or along with water for additional soothing and healing.
  • beeswax – For when you need a heavier cream – think foot cream, heavy-duty hand cream.

Could you also get some silk amino acids?  And maybe some panthenol?  Possibly some fragrance oils?  Of course, but when would I ever end this list?  There are so many possibilities.  That is the beauty of making your own products; it’s a wonderful combination of science and creativity.  That’s why I love it!

What would you add to this list?  Please drop suggestions in the comments.

Email Question: New Preservative?

Happy New Year!  I hope you had a wonderful holiday season.  I gave lots of handmade lotions as gifts and they were very well-received!  I love to give homemade gifts, don’t you?  Did you notice the new category in the menu above?  Skincare Recipes is a new category just in case you’d like to browse recipes only 🙂

When it comes to email questions, there is no question: most of you want to know about preservatives.  It is the single most asked about topic in my inbox.  For my post about the basics of preservatives, click here. Also, check out this awesome email question:

While I’m new to all this homemade stuff, my main motivation is a) reducing my overall chemical intake and b) helping my daughter with a newly developed skin problem. I’ve found quite a bit of info on the Internet, but not all of my questions have been answered despite extensive research. I’ve just started delving into the pH levels of products and have searched for a preservative that won’t negate the positive effects of making my own products. I ran across one at Texas Naturals and wondered if you have had any experience with it. It’s called Tinosan (Silverion 2400) and reading about it, sounds a viable alternative to the more common preservatives. Do you have any info/experience with it. I’d love your input. Thank you so very much and have a wonderful day.

I actually have no experience with this preservative nor have I ever heard of it.  You know what I use: Optiphen.  I really don’t stray from that.  I’m a bit of a creature of habit and once I find something that works, I tend to stick to it, especially when it comes to something like a preservative.  As long as it kills microbes (bacteria, fungus, mold, yeast), can be used at a low concentration, and doesn’t have parabens or formaldehyde, I’m with it.  I did check this preservative out though and I offered my very humble and not professional opinion. See below.

So here’s what I think about Tinosan: a silver compound would definitely kill bacteria.  The site does recommend that you use it with potassium sorbate to protect against other microbes like yeast, mold, and fungus.  It can be used at pretty normal pH levels.  The temperature concerns me a bit, 122 degrees (I assume they mean Fahrenheit), because that’s pretty low.  You would have to emulsify, let cool, then add Tinosan.
My last concern is that it’s light-sensitive.  Most silver compounds are light sensitive.  I wonder if it would lose effectiveness over time if exposed to light.
So should you use it?  I really couldn’t answer that.  You could try it out and see how you like it. Optiphen is my preservative of choice and it’s also paraben-free and formaldehyde-free.  It’s the preservative I’m familiar with.
If you do try Tinosan, I would love an update on how you like it.
And that’s it for today!  As always, email me at hippiebrowngirl@gmail.com if you have questions.  I always reply!

Email Question: Coconut Oil

It’s been a while since I’ve featured an email question but I have been receiving questions and I do always answer!  Answering email questions is fun so keep them coming 🙂

This is a quick question:

Hello, first thing I love your website, it has been a great source for my journey into a more natural way of life.  Now onto my question… Coconut oil is my issue, I know fractionated is a liquid form, I use it with my essential oils. Extra Virgin coconut oil is a rapid melting solid, I use it to cook with.  Lots of homemade lotions and lotion bars call for coconut oil….what type is that?  Sorry to sound clueless but I guess I will just have to sound that way because I am, so maybe you can help.

Thanks for any clarification you can give me.

Coconut oil is touted as a miracle oil.  Honestly, it’s not in my top 5 favorite oils.  It’s pretty great for some people’s hair (not mine but my younger daughter’s hair loves it) and some people swear it’s good for skin.  I will say this and I’m prepared for whatever backlash I might receive: I will not use regular coconut oil on skin.  Especially not my face!  Coconut oil has known comedogenic properties, meaning it has a tendency to clog pores.  Besides that, I’ve used it on my body and my daughters’ and I’m pretty sure it made everyone’s skin drier not to mention the very greasy feeling.

Fractionated coconut oil is preferable over regular coconut oil.  It is a liquid at room temperature and it is much lighter and more easily absorbed.  It is also less likely to clog pores.  For me, extra virgin coconut oil (and olive oil, for that matter) is for cooking and maybe hair but that’s it!

Email me at hippiebrowngirl@gmail.com !

Peppermint Eucalyptus Foot Cream

foot cream

How’s the weather where you are?  Temperatures are starting to dip for us here in the Northeast and so my socks are being dug out from the bottom of my drawer.

I’m not much of a sock girl.  I just love to be barefoot, even inside of shoes.  I rarely wear sneakers (although I’ve been on the hunt for a great pair I love for years now!) and I spend as long as I possibly can in sandals – not flip flops though, I hate flip flops.  My desire to be barefoot can’t compete with the fact that my feet are always the first part of my body to feel the change in weather though.  On our first day with 40° F temperatures, I rummaged around a bit and found my favorite fuzzy socks.  One of my favorite things to do is give myself a foot scrub, slather foot cream on and then immediately put my feet into thick socks.  If you’ve never tried this, you have never felt the true awesomeness of buttery soft feet.  This ritual can only be performed during the months of November and April for me because if it’s too warm out, things can get kind of gross.  So as soon as the temperature permitted, I had to whip up a batch of this scrumptious cream!

This recipe makes 227 grams/8 ounces.

Water Phase

  • 55 grams of colloidal oatmeal tea [see this post for how make it]
  • 58 grams distilled water
  • 9 grams raw honey

Oil Phase

  • 15 grams kukui seed oil
  • 7 grams castor oil
  • 13 grams avocado oil
  • 37 grams shea butter
  • 7 grams beeswax (or other wax of your choice)
  • 15 grams emulsifying wax
  • 7 grams conditioning emulsifier/BTMS

Cool Down Phase

  • 3 grams Optiphen
  • peppermint essential oil (I like 2nd distill because it has more of a sweet candy cane scent but that’s up to you!)
  • eucalyptus essential oil

For information about how to combine these ingredients, see this post

You can add peppermint and eucalyptus oils until you have the smell and tingle you prefer.  I don’t really measure it when I’m making the cream because I smell to see if it’s ready but I don’t exceed 2 grams (that’s probably a lot!).

I promise your feet will be relaxed and silky soft!  Spend all winter pampering your feet so they can be ready to be bare in the summer.

THE BEST SCRUB EVER

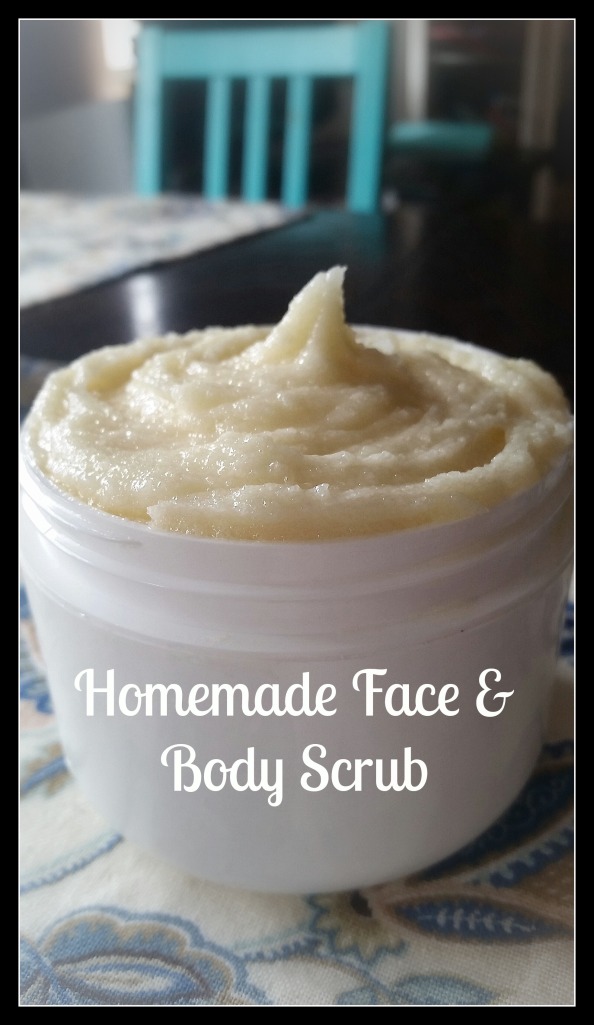
20140724_121137_1.jpg Yes, the title has to be in all caps.  It’s for emphasis.  I need all caps because I’m so excited that after some hundreds of trials, I have finally formulated a scrub I like. I’m, of course, picky about my skincare products.  Duh. That’s mostly why I make my own.  But I am particularly picky about scrubs.  It is so easy to create a scrub that sucks.  It’s much harder to make a crappy lotion or cream.  There are a few store-bought scrubs I like but they always have at least one of two problems: either they have unsavory ingredients or they cost too much.  As for most DIY scrubs…I have a few issues with them.

They are greasy. This is my biggest problem with most DIY scrubs.  They contain oil, salt, and sugar.  This does not a yummy scrub make!  Sure, it will exfoliate but so does a sandbox.  If you’re the kind who likes to scrub often or scrub your whole body, after a while of using this combination of ingredients, your pipes will start to suffer.

They don’t rinse clean. This is related to the fact that they are greasy.  I don’t like oily or sticky residue after scrubbing.  I want my skin to feel supple, yes, but I also want it to feel clean.  I want to moisturize as usual and be on my way.

They are sticky. Sometimes I see a recipe that doesn’t call for much oil or any at all.  Usually, in its place, glycerin is used.  Glycerin is not a bad ingredient for a scrub.  It rinses better than oil but it can leave a sticky film that lingers if you use too much.  It’s a humectant, meaning it draws moisture to the skin, so it has its benefits.

They’re too abrasive. Too much salt can make a scrub harsh.  Sugar is gentler.  Brown sugar is really gentle.  A combination of sea salt and sugar is best, more sugar than salt.

The texture is just all wrong! A good scrub should spread easily, have some slip, feel grainy but not like kitty litter or small pebbles. It should make your skin feel clean, soft, and touchable.  The texture is the most important part of a good scrub!

I like to use my scrub 2-3 times a week on my face and as needed on my body, usually right after I shave for super silky smoothness.  I cleanse, scrub, moisturize – in that order.  You’ll notice that amounts are given in volume, not in mass like I normally prefer.  My scale is broken for the 3rd time and I refuse to buy the same one again but I can’t find one I like.  If anyone has any suggestions, please share!  Volume works well enough here though.

Ingredients & Tools

  • 1 tablespoon cetyl alcohol
  • 2 tablespoons jojoba oil
  • 2 tablespoons castile soap
  • 1 tablespoon glycerin
  • 1 tablespoon witch hazel
  • 2 teaspoons vitamin E oil
  • 1/2 teaspoon Optiphen
  • 2 teaspoons silk amino acids (optional!)
  • essential oils (optional, just make sure they’re safe for use on the face)
  • 1/2 cup sugar (organic brown if you’re sensitive)
  • 1/4 sea salt (you can use black salt if you’re fancy)
  1. Combine cetyl alcohol, jojoba oil, and vitamin E oil in mixing container.  Heat until just melted, either in the microwave or in simmering water.
  2. In a separate glass or Mason jar, combine glycerin, witch hazel, silk amino acids.  Add to the mixing container.
  3. Using the immersion blender, blend briefly until it’s combined and thick – should take less than 15 seconds.  Add castile soap and essential oils (if using).  Blend for 5 seconds or so.  Transfer mixture to the bowl.  Let it cool about 10 minutes.
  4. Stir in Optiphen, salt and sugar.  Spoon into your storage container.

BEST SCRUB OF ALL TIME.  Pin it here!

You can add all kinds of stuff and make all kinds of substitutions.  The sky is the limit, let your imagination run free! Send questions my way at hippiebrowngirl@gmail.com and stay tuned for another email question session soon.

Homemade Hair Growth Serum

jbco 2

I recently got a haircut that I hate.  I had just gotten my hair to the length I wanted and went to the stylist to have it cut into the shape I wanted and even it out some.  Unfortunately, just about all my length is gone now.  I am quite annoyed because I told him exactly what I wanted – just the back and the sides, don’t really touch the top or the front.  I should have said something as soon as I saw the first large tuft of hair fall but I think once I saw that, I just kind of gave up and accepted that I would have a haircut I didn’t really like.  *sigh* It happens to the best of us at least once, I guess.  And like everyone is saying, it’s just hair.  It will grow back.  Welllll, I want it back now!  I especially want my little sideburns back.  How you gonna just take those off without permission?  I need those!  So since I’m in a rush for my hair to grow back, I made a little concoction to speed things up a bit.

Scalp stimulation is key for fast hair growth.  I strongly recommend head massages on a regular basis.  Don’t make a habit of playing with your hair but massaging the scalp does wonders for growth.  This serum only requires 3 ingredients.

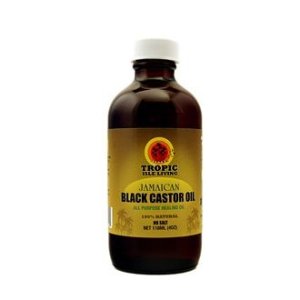
  1. Jamaican black castor oil
  2. peppermint essential oil
  3. rosemary essential oil

Place about 3 tablespoons of castor oil, 30-40 drops of peppermint oil, 30-40 drops of rosemary oil in a small container.  Mix thoroughly.  Apply to your scalp and MASSAGE your scalp with gentle to moderate pressure for at least 10 minutes.  Let the mixture sit on your scalp and tingle and do its work for at least an half an hour.  You probably want to wear a plastic shower cap so you don’t get oil all over your furniture and stuff.  Shampoo and condition as usual after.  Repeat as often as necessary.  I’m probably going to do this everyday or every other day until I achieve at least 1 or 2 inches of growth.

I think this cut has traumatized me enough that I might go back to long hair and scrap this whole #shorthairdontcare attitude.  Maybe I’ll be brave enough to post a picture in a week or two after I recover and come to terms with my hair.  A lot of drama, I know, but this is the first time I’ve ever truly hated my hair and couldn’t even find a way to improve it somewhat while I wait for growth.  I tried a hat but that was worse.  Maybe it’s about time I build a scarf collection.

Lotion Making Math & Ratio Guide

ratio graphic.jpg

I say it all the time but I’ll say it again.

I LOVE GETTING YOUR EMAIL QUESTIONS.

The teacher in me loves to answer questions.  I just love to help and spread knowledge!  I especially love when people ask me questions about topics we both love…like making beauty products!

Many of the questions I get are about math and proportions of ingredients.  In one of my favorite emails the author said she was “math challenged.”  Fear of math is pretty common.  I completely understand.  In this post, I’m going to quickly discuss how to do the math you need to make lotion.  It’s easy.  At the end, I will share an ingredient ratio guide for products.

Let’s do a quick lesson on percentages.

If a manufacturer says that a preservative is effective at 1% concentration, what do you do?  

If you are making batches of lotion to use at home, you’re probably making fairly small batches, probably no more than 20 ounces.  Measuring 1% of 20 ounces is easy.  First, move the decimal 2 places to the left.

1% becomes 0.01

Now you can multiply.

0.01  x  20 ounces  = 0.2 ounces of preservative

I don’t like using ounces because they’re not precise enough to me.  I like to use grams.  There are 28.3495 grams in an ounce.  So if you’re making 20 ounces,

20   x  28.3495  = 567 grams

0.01   x   567 grams = 6 grams of preservative

If a recipe calls for 60% water, you do the same thing.  First, move the decimal 2 places to the left.

60% becomes 0.60

0.6   x  20 ounces = 12 ounces of water

or, in grams

0.6   x  567 grams = 340 grams of water

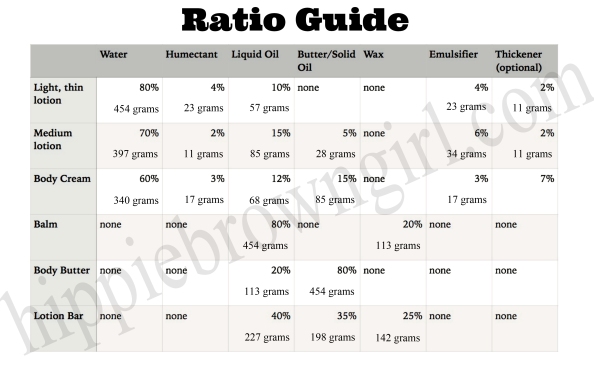
Okay, good.  Now that we’ve gotten that out of the way, here is a great ratio guide.  The grams given are for making a batch that weighs 20 ounces/567 grams.

 ratiosandgrams

Notice that I called this a ratio guide, not a stone tablet of ratios.  You may change these.  One of my favorite body cream recipes doesn’t follow this guide too closely.  I wanted it creamier so I increased the butter and emulsifier, decreased the water, and left out thickener.  Please play with proportions!  If you ever want to write and customize your own recipes, you have to be willing to experiment with proportions.  That’s the only way to get information!

I hope this answers any math questions!  As always, please email hippiebrowngirl@gmail.com with questions.